


The Use Of SmartMap Data In GIS Software
17 June 2021
What is GIS Software?
- Software used to view, edit and analyze all types of geographic and spatial data.
- GIS software useful for:


Types Of GIS Software

Available SmartMap Data Layers For GIS Software
Supported Type of SmartMap Data Layer For GIS Software
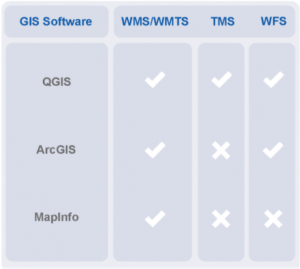
Supported Type of SmartMap Data Layer For GIS Software


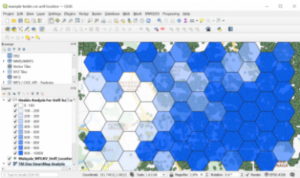
Spatial Analysis Available in GIS Software
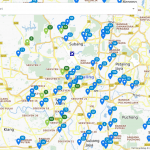
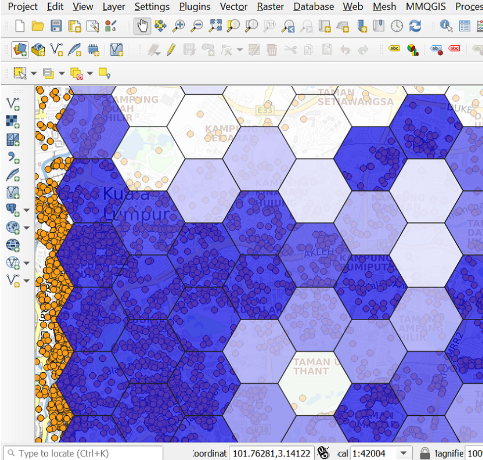
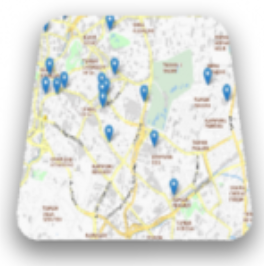
To create a density map that shows the concentration in an area.
- Example Use Case: Marketing planning – target the area with less customer subscription & approach for sales to offer a package of service.
- Spatial Analysis tool in QGIS – Grid Analysis (Hexagon) & Count in Polygon
- Data used: Your customer’s data & Property data
How to Include SmartMap Data into GIS Software?
a) Add WMS/WMTS
1. Go to the Layer tab and navigate to the Add WMS/WMTS option. Also, you can locate the icon to directly access this option in the left panel of your QGIS. It will display a window where we will add the WMS service to our map.
2. As it is our first time using this option it is normal that this list is empty. If we click in New the connection details window will pop up. In this window, all the services we add will be listed and can be used in future sessions.
3. In the name field you may put any name to describe the URL and in the URL field, copy URL WMS or URL WMTS and paste in the URL field.
i. URL WMS:
ii. URL WMTS:
*** Notes: Replace the YOUR_API_KEY with the API key provided to you.
4. Click ‘OK’ and the window will close and the new service will be shown in the list.
5. Select it and click ‘Connect’, this action will establish the connection between your application and the WMS/ WMTS server. In the lower part all the available layers within the service will be shown.
6. For layer WMS/WMTS, choose one TMSmartMap layer. Once the desired layer is selected, click ‘Add’ and the layer will be displayed in the map view.
For more detailed steps with images to add WMS/WMTS in QGIS: https://www.smartmap.tm.com.my/docs/api/#/qgis?id=add-wmswmts-layer
b) Add TMS
1. Go to the ‘View’ tab, and click ‘Panels’ and click ‘Browser Panel’.
2. Right-click Tile Server (XYZ) at Browser Panel and click ‘New Connection’.
3. Insert URL TMS and click ‘OK’ to add layer TMS. Enter the name of the tile layer and click ‘OK’ to finish.
4. Click drop-down at Tile Server (XYZ) to show the list of layers. Double click at layer to display the map.
i. URL TMS:
*** Notes: Replace the YOUR_API_KEY with the API key provided to you.
5. The map will display.
For more detailed steps with images to add TMS in QGIS: https://www.smartmap.tm.com.my/docs/api/#/qgis?id=add-tms-layer
c) Add WFS
*** Requirement: QGIS 3.4 and above
1. First, you need to load the map by WMS/WMTS or TMS.
2. Before loading WFS, there is a setting to increase the timeout error or don’t allow to keep reconnecting when time-out.
- Settings -> Options -> Network, change the “Timeout for network requests (ms)” or set 1 to “Max retry in case of tile or feature requests error“
** You can skip this step if you don’t have any issue with public internet speed slow.
3. To load WFS, click Layer -> Add Layer -> Add WFS Layer. Click the ‘New’ button.
4. In the dialog that appears, enter the Name and the URL as:
*** Important: Make sure you untick the Enable feature paging.
*** Notes: Replace the YOUR_API_KEY with the API key provided to you.
5. Click ‘OK’, and the new connection will appear in your Server connections.
6. Click ‘Connect’. A list of the available layers will appear.
7. Select the layer and click Add to add the WFS layer to the map.
8. It may take a while to load the layer. When it has loaded, it will appear on the map.
For more detailed steps with images to add WFS in QGIS: https://www.smartmap.tm.com.my/docs/api/#/qgis?id=add-wfs
1. Launch your ArcMap (version 10.0 and above) and navigate your mouse to the ‘Catalog’ pane. Expand the ‘GIS Servers’ section and double click on ‘Add WMS Server’, as shown in the below figure.
2. Following the ‘Add WMS Server’ window will pop up on your screen.
i. Key in or copy and paste the SmartMap Data full URL (with API key) provided to you in the ‘URL:’ text box. The Smartmap Data full URL is as below:
*** Notes: Replace the API_KEY with the API key provided to you.
ii. Leave the ‘Version:’ drop down as ‘Default version’, ‘User:’ and ‘Password:’ value of ‘Account (Optional)’ section can leave blank.
iii. Click on the ‘Get layers’ button. All the available SmartMap map layers will display in the WMS tree folder.
iv. Click on the ‘OK’ button to close the ‘Add WMS Server’ window. A new WMS Server connection “smartmap.tm.com.my” will be added to your “GIS Server” tree folder of the “Catalog” pane, as shown below figure.
3. Expand the ‘smartmap.tm.com.my’ server connection by clicking on the ‘+’ sign, all the available SmartMap map layers will display in the tree folder.
4. Browse and select the ‘TM One SmartMap’ map layer from the tree folder.
5. After selecting the ‘TM One SmartMap’ map layer, use your mouse to drag and drop the map layer into the ArcMap map window. You should see the world map display in the ArcMap map window and the selected layer in the ‘Table of Contents’ pane on your left.
6. Using the Zoom in function of ArcMap to zoom into the Malaysia map region, the map window should display a more detailed map as you zoom in more.
For more detailed steps with images to add WMS in ArcGIS: https://www.smartmap.tm.com.my/docs/api/#/esri
1. Open Mapinfo 9.5 or above.
2. Go to ‘File’ > Open Web Service, choose WMS (or WFS).
3. Click button ‘Server’.
4. Click the button ‘Add’ to add a new connection.
5. Fill in the details with the server URL below and click the button ‘OK’:
*** Notes: Replace the API_KEY with the API key provided to you.
6. Select the new server connection and click the button OK.
7. Select a layer to add, adjust the table file location and click the button OK.
8. The map will display.
For more detailed steps with images to add WMS in MapInfo: https://www.smartmap.tm.com.my/docs/api/#/mapinfo?id=add-wms-layer
Related Posts
SmartMap Site Selection Recommender gives you suggestions of the best solution for your new outlet o...
Geocoding and reverse geocoding data from Smartmap API can be used in GIS software, and a basemap la...
With TM ONE SmartMap, geocoding and reverse geocoding are made simple.